 Biostatistics | Center for Clinical and Translational Science
Development and Production Status
There are several possible statuses for your REDCap project. Each status corresponds to a project phase and determines what kinds of actions can be taken within your database. It’s important to understand and use statuses appropriately to ensure valid data collection and auditing.
The current status of your project is visible at the top of the Project Setup page.

When a new project is created, its default status is development. When a project is in development status, you can easily add, edit, and remove data collection instruments and fields. You can also set up longitudinal data collection and events and modify other settings and configurations. Any changes to your project’s structure and settings will be made in real time and may not be tracked by the REDCap logging system.
Survey links, data collection instruments, email alerts, and reports will work while a project is in development status. It is important that you thoroughly test all instruments and modules to ensure every part of your project works as expected. During the testing process, try to enter nonsensical data to test branching and validation rules.
Since all development-status changes are made in real time, it is possible to unintentionally make a change that results in data loss or corruption. Therefore, it’s very important that you do not collect any real project data while a REDCap project is in development.
After a project has been created and tested, the project should be moved to production status. (See below for instructions.) You should only begin to collect real project data after this status change has been made.
When a project is in production status, further changes are restricted to prevent unintentional data loss and to allow you full control of the live version of your project. It is still possible to edit data collection instruments and project settings, but most changes won’t happen in real time and will be subject to administrator review and approval. The approval process can take up to two business days. See below for more about making changes in production status. In general:
- If changes don’t cause any critical issues for existing data, they will be approved automatically.
- If changes could cause critical issues for existing data, a REDCap administrator will contact you by email to discuss and confirm revisions.
Any changes to your project in production status will be tracked on the Project Revision History page, allowing reversions to an earlier version if necessary.

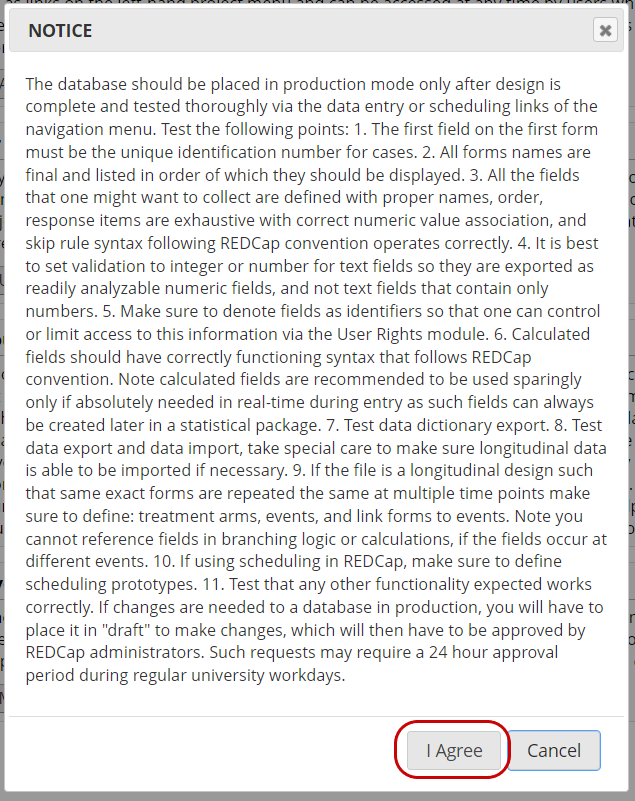
When you are ready to move your project from development to production status, open the Project Setup page and scroll to the bottom. Click Move project to production.

Read the pop-up window’s reminders about project functionality and testing. If you are ready to proceed, click I Agree. To go back and continue testing, click Cancel.
You will have the option to retain or delete the test data you collected while in development status. Read the information in the pup-up window, select the best response, and then click YES, Move to Production Status.

You will see a green banner indicating that your project has been moved to production.

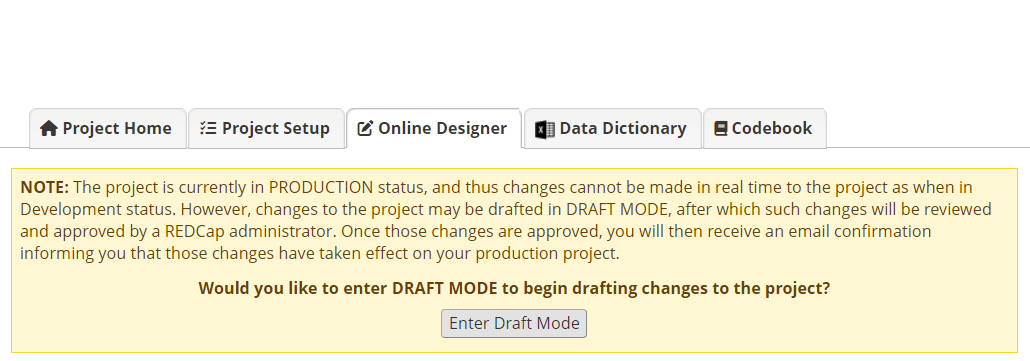
If you need to make changes to data collection instruments while in production status, follow the steps below.
Navigate to the Online Designer. Read the explanation of the procedure in the yellow box at the top of the page. If you want to proceed, click Enter Draft Mode.
Click on the name of the data collection instrument you want to edit. Add, edit, or delete fields as usual. Remember that changes will not be made in real time.
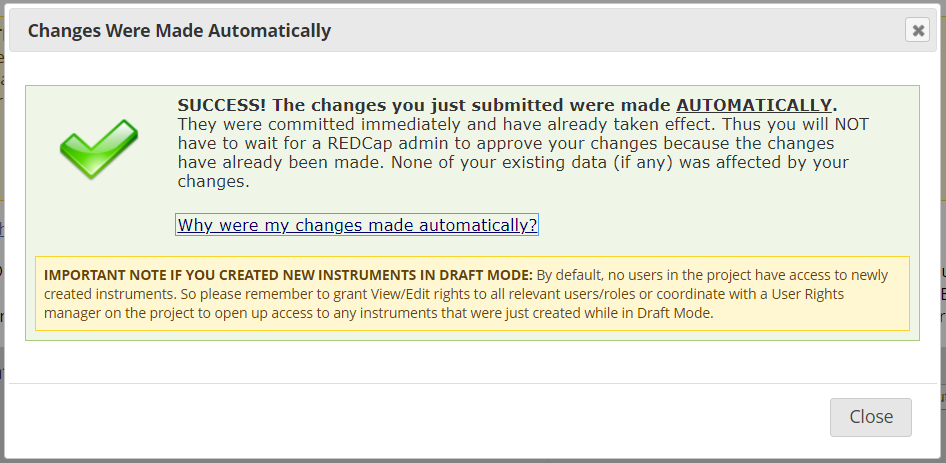
When you have made all needed changes, submit them to the administrator for review by clicking Submit Changes for Review at the top of the Online Designer page.

Read the text in the pop-up and then click Submit.

If your draft changes don’t alter existing data, you may be notified that they were automatically approved.
If changes might alter existing data (for example, deleting a field or altering multiple-choice options when data are present), they will not be automatically approved. Instead, they will be sent to the REDCap administrator for review. You cannot enter draft mode to make further edits until the requested changes have been reviewed.
While changes are pending approval, you’ll see a message at the top of the Online Designer.

The REDCap administrator will respond to your request to make changes within two business days. They may email you to ask you to visit the Project Modification Module and review all drafted changes, especially potentially critical issues. It’s important that you carefully review all changes and understand the potential consequences.

After you review drafted changes, respond to the REDCap administrator to tell them how you want to proceed. You can choose to do one of the following:
- Commit all drafted changes
- Keep the drafted changes but return to draft mode to continue editing
- Erase all drafted changes and revert to the state before draft mode was enabled
If you choose to proceed with the changes, you will be notified when they have been approved.
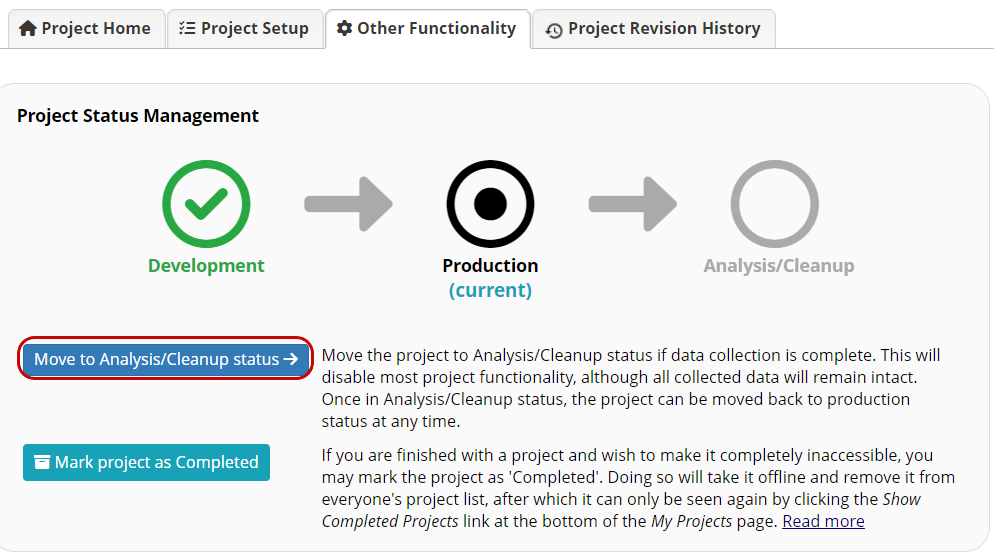
After data collection is complete, you can move the project to analysis/cleanup status. This will disable most project functionality, although all collected data will remain intact. Once in analysis/cleanup status, the project can be moved back to production status at any time.
To enter Analysis/Cleanup status, navigate to the Other Functionality tab. Click Move to Analysis/Cleanup status.
If you are finished with a project and wish to make it completely inaccessible, you may move the project to completed status. Doing so will take it offline and remove it from all users’ project lists, after which it can only be seen again by clicking the Show Completed Projects link at the bottom of the My Projects page.

Once a project has been marked as completed, only REDCap administrators can access it and only administrators can return it to accessible state for all project users. Marking a project as Completed is typically only done when you are sure that no one needs to access the project anymore, and you want to ensure that the project and its data remain intact.
To enter completed status, navigate to the Other Functionality tab. Click Mark project as Completed.
