 Biostatistics | Center for Clinical and Translational Science
Automated Survey Invitations
For any REDCap instrument enabled as a survey, you can schedule email invitations based on conditional logic via the Automated Survey Invitations (ASI) module.
This guide includes material adapted from the official REDCap Help & FAQ, Women’s College Hospital, and The Children’s Mercy Hospital.
Automated Survey Invitations allow you to invite participants to take your surveys automatically, without manual action, based on pre-defined triggers and conditions.
For example, you might administer a screening survey to potential study participants. You can define an ASI to send an enrollment form link to all respondents who meet certain screening criteria.
To use ASIs, you must first designate an email field to use for invitations in your project. The email field must exist on one of your instruments and have email validation enabled (Figure 1). Be sure the email address will be collected before invitations will be scheduled. In a scenario like the screening-and-enrollment example above, you might collect respondents’ email addresses on the initial screening survey.
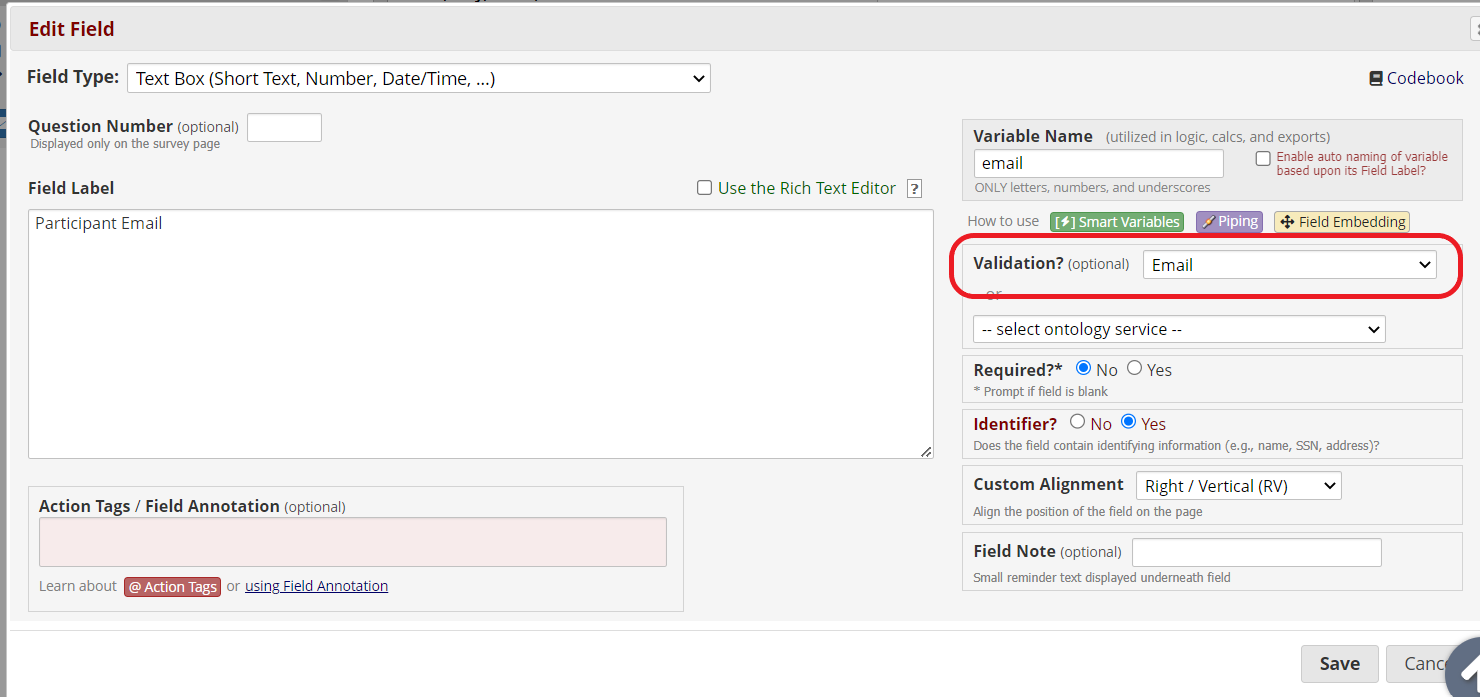
Figure 1: Enable email validation
To designate a project-wide email field, navigate to Project Setup and click Enable next to “Designate an email field for communications (including survey invitations and alerts).”
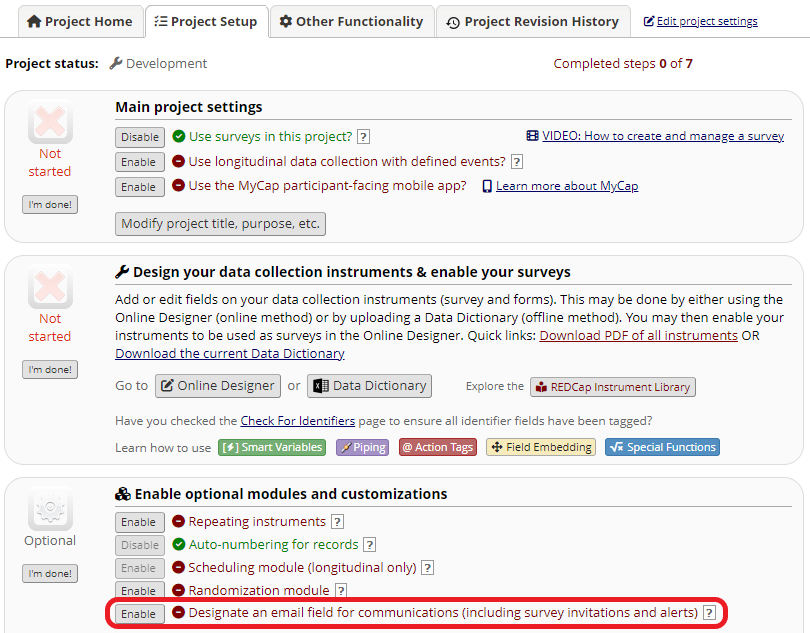
Figure 2: Enable ‘Designate an email field for communications’
Choose the email field to use for your survey invitations and then click Save.
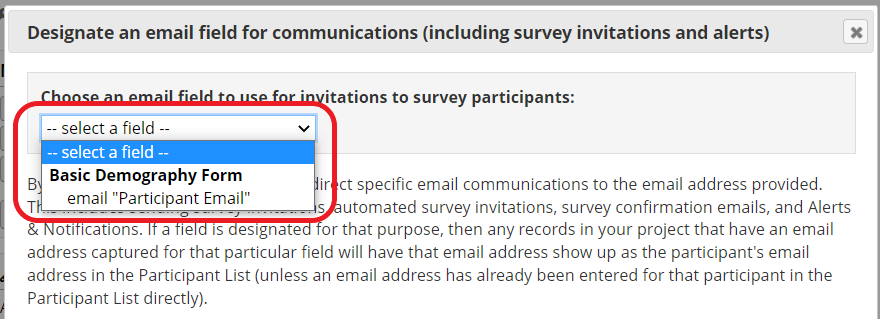
Figure 3: Select the email field
Note that you can also set survey-specific email invitation fields. This can be useful if, for example, one survey in your project should be completed by a patient’s clinician rather than the patient. To designate a survey-level email field, open that survey’s Survey Settings page and navigate to the Survey Customizations section.
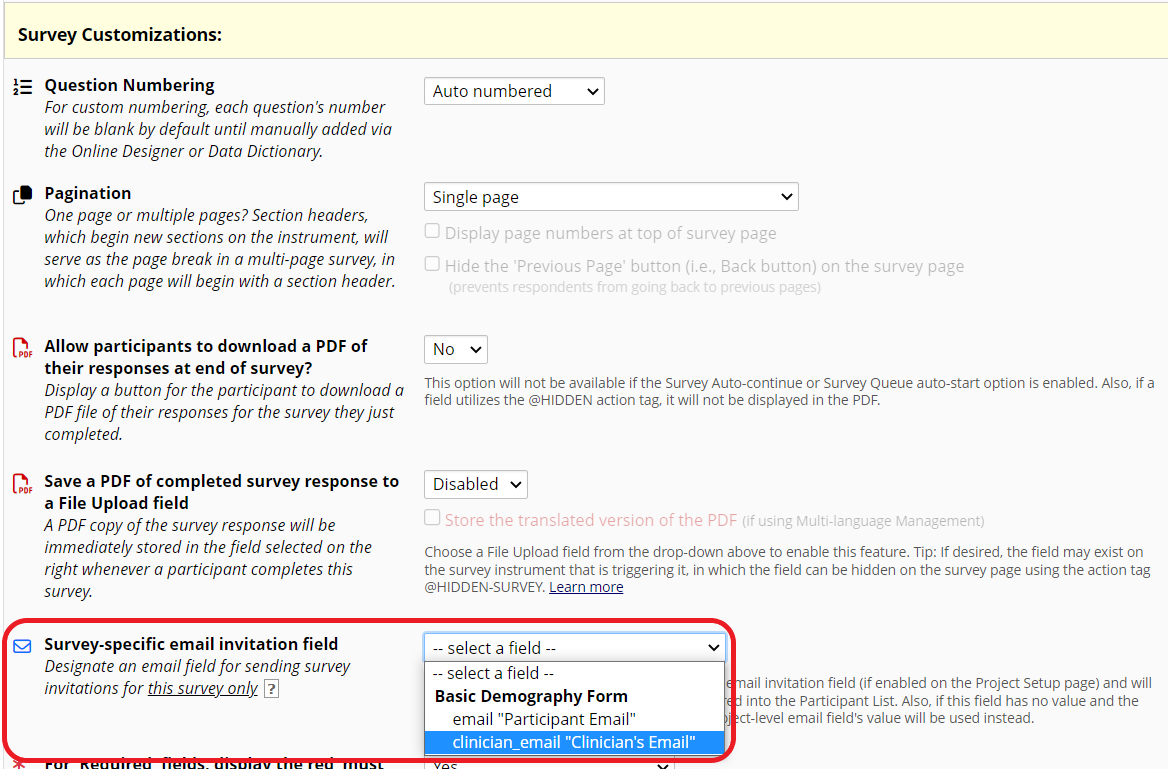
Figure 4: Designate a survey-specific email field
To set up ASIs for a particular survey, navigate to the Online Designer and click the Automated Invitations button.
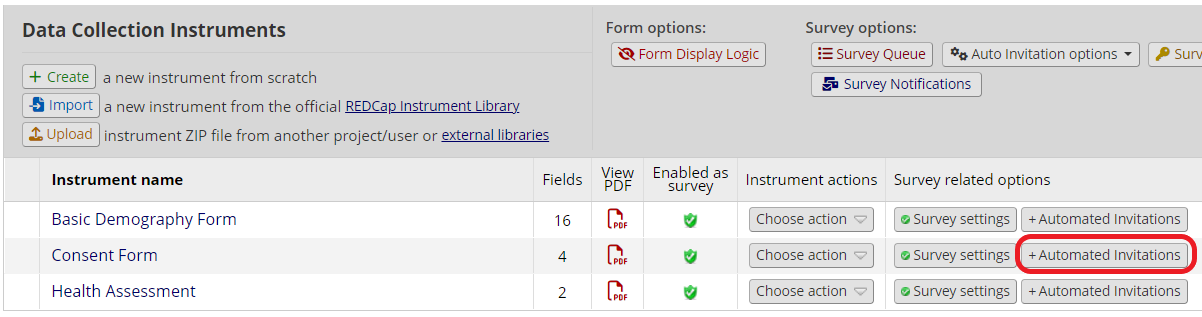
Figure 5: Open Automated Invitations from the Online Designer
Edit each of the following fields:
- From: Use the dropdown menu to select an email address. This may include any user with access to your project. You can optionally edit the sender’s display name.
- To: This will automatically include all participants who meet your criteria.
- Subject: Enter an optional email subject line.
- Message: Customize the email message.
You can use HTML formatting, piping, and smart variables in your subject line and message. Be sure to retain a [survey-link] or [survey-url] smart variable in the message body. These smart variables will be replaced by individual-specific survey links when invitation emails are sent and will allow recipients to access the survey.
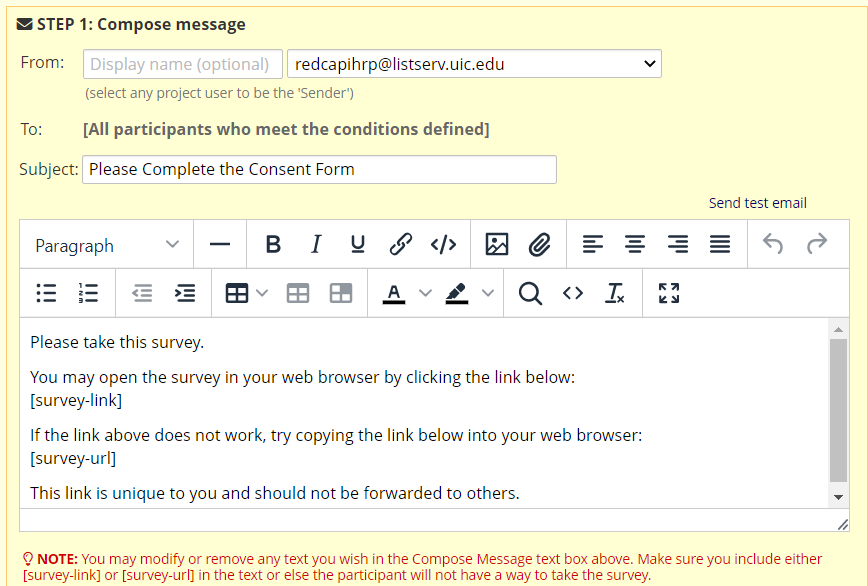
Figure 6: Compose your message
Use this section to define the conditions that will trigger an email invitation. You can elect to send the invitation after a preceding survey is completed, after a condition is met, or after a combination of events and conditions. Note that the ASI works by “listening” for changes in record values or survey completion status. As such, it will only work for records that meet the criteria after the ASI has been defined and enabled.
- To use survey completion as a trigger, check the box beside “When the following survey is completed” and select the trigger survey from the dropdown box.
- To use user-defined logic, check “When the following logic becomes true” and type your conditional logic in the logic box. Your conditional logic must be a statement that evaluates to either true or false. It can use piping, special functions, and smart variables.
- Use the dropdown menu to select “AND” (all conditions must be true) or “OR” (at least one condition must be true).
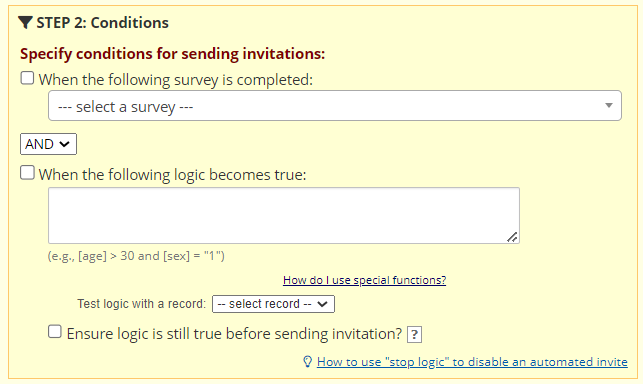
Figure 7: Define your conditions
In some cases, you may wish to cancel the invitation email if a condition changes between when the email is scheduled and when it’s sent. For example, a study participant may no longer meet inclusion criteria or may withdraw before being invited to take a follow-up survey. To stop an invitation from going out when a condition changes, make sure you incorporate the inclusion criteria into the logic box and then check “Ensure logic is still true before sending invitation?”
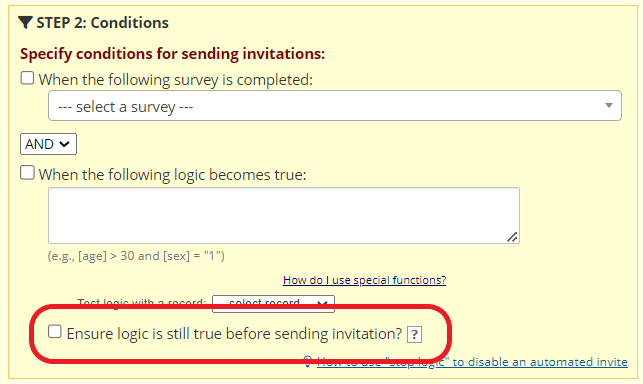
Figure 8: Ensure logic is still true
The REDCap documentation explains:
If you have Automated Survey Invitations (ASIs) that will not be sent immediately but instead are scheduled to be sent later, it might be a good idea to consider using ‘stop logic’ (otherwise known as a ‘kill switch’) in your conditional logic in order to manually stop these scheduled invitations when needed. […] By having the [‘ensure logic is still true’] checkbox checked, it means that every time a given record is saved or has data modified, REDCap will see if there is an invitation scheduled for this record/survey, and if so, it will then double check to see if this condition/logic is still true. […]
The ‘stop logic’ could be a complex set of conditional logic, or it could be as simple as a single field in the project (i.e., the kill switch). For example, if you are wanting a survey invitation to be scheduled when a participant is at least 18 years old, your logic might be ‘[age] >= 18’. And if you want to add the ‘stop logic’ to be able to manually delete a scheduled invitation, you could have ‘[age] >= 18 and [remove_alert] <> 1’, in which the field ‘remove alert’ is a Yes/No field. So in this instance, if you wanted to have the scheduled invitation deleted, you could simply go to the data entry form where the ‘remove alert’ field is located, and set it to ‘Yes’.
ASIs are scheduled immediately when a record meets the conditions defined in Step 2. However, you can decide whether they are sent immediately or at a later time in Step 3.
You have the option to send ASIs:
- Immediately
- On a specific day of the upcoming week
- After a specific time lag
- At an exact day and time
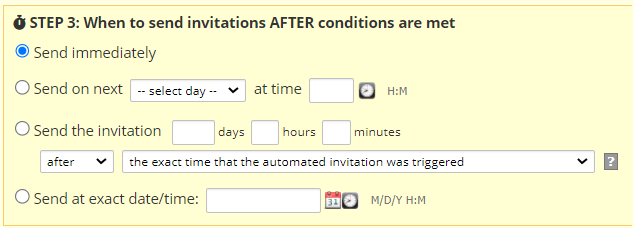
Figure 9: Schedule the ASI
You can also elect to send up to 5 reminders after the initial invitation if a survey hasn’t been completed.
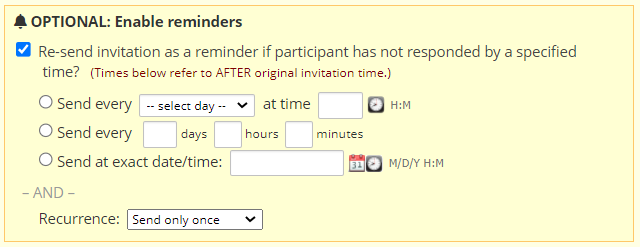
Figure 10: Schedule follow-up reminders
If the survey is enabled as a repeating instrument, you can decide whether to send invitations:
- Just one time
- A set number of times at a set interval
- An unlimited number of times at a set interval
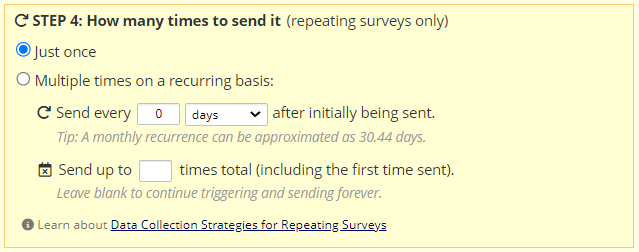
Figure 11: Repeating invitations
Set the ASI to “Active” to begin evaluating the Step 2 conditions and scheduling emails. To stop evaluating the logic and scheduling emails, set the ASI to “Not Active.”

Figure 12: Activate the ASI
It’s important to understand that ASI status (Active/Not Active) refers to whether invitations will be scheduled, not whether they will be sent. As the REDCap documentation explains:
Setting the ASI to ‘Not Active’ will not prevent any invitations from sending if they have already been scheduled, in which case they must instead be deleted manually via the Survey Invitation Log. Additionally, even if the ‘Ensure logic is still true’ setting is enabled, any already-scheduled invitations will not be re-evaluated while the ASI is set to ‘Not Active’.