 Biostatistics | Center for Clinical and Translational Science
Data Import Tool
The Data Import Tool allows you to upload data from a CSV file to your REDCap project. This can be useful if data were collected using a spreadsheet or another external process or system.
You might also use the Data Import Tool to edit multiple existing records at the same time. To accomplish this, you could download the existing data, add or change specific values, and then import the modified dataset.
These instructions assume your REDCap project already contains the instruments and fields you want to populate. If you have not yet built your forms and surveys, you must do that before using the Data Import Tool.
Click Data Import Tool in the left menu under Applications. Then download your Data Import Template by clicking the link in the first paragraph under “Instructions.”
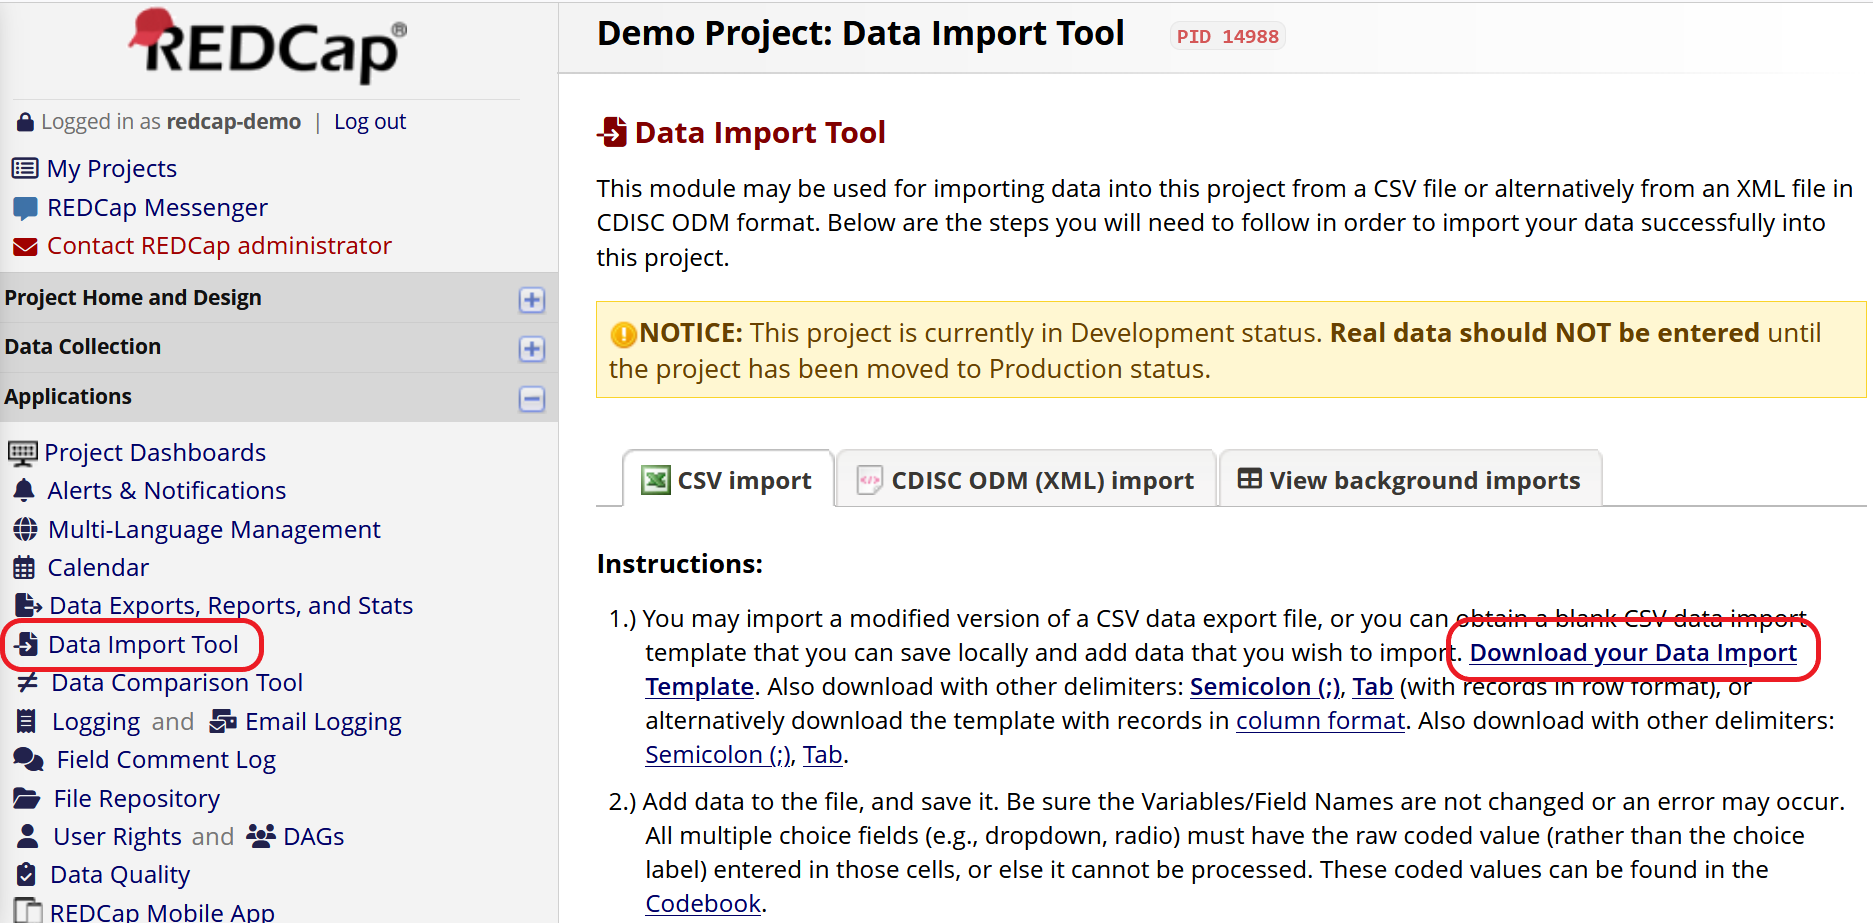
Figure 1: Data Import Tool
The Data Import Template is a CSV file. It contains column headings that match the field names in your project. The template also includes automatically generated fields that capture information about each form. See below for more about how to use each of these system-generated fields.
- A field will indicate the completion status of each form. For example, if you have an instrument called “Demographics”, the Data Import Template will include a field called
demographics_complete. - If your project is longitudinal, with multiple events, the template will include the field
redcap_event_name. - If your project includes repeating instruments, the template will include the fields
redcap_repeat_instrumentandredcap_repeat_instance. - If your project uses Data Access Groups, the template will include the field
redcap_data_access_group.

Figure 2: Data Import Template
Fill in the CSV template with the data you want to import, being sure to keep the column names intact. You must retain the record identifier (e.g., record_id) as the first column. You can reorder other columns or delete columns that aren’t relevant to your import.
Requirements for some different field types are explained below.
The record ID field must be the first column in your file, just as it must be the first field in your project. To edit existing records, match the values in this column to their existing REDCap IDs. To create new records, include a unique value in this column for each unique record.
During the import process, you can choose whether to retain the record IDs in your CSV or let REDCap automatically assign new ID values. Even if you want REDCap to auto-number new records, you must include a unique placeholder as the record ID for each record.
Date values must be formatted as one of the following:
- YYYY-MM-DD (e.g., 2024-01-31)
- MM/DD/YYYY (e.g., 01/31/2024)
- DD/MM/YYYY (e.g., 31/01/2024)
Date-time values must be formatted as one of the following:
- YYYY-MM-DD HH:MM[:SS] (e.g., 2024-01-31 13:59:59)
- MM/DD/YYYY HH:MM[:SS] (e.g., 01/31/2024 13:59:59)
- DD/MM/YYYY HH:MM[:SS] (e.g., 31/01/2024 13:59:59)
Use 24-hour time notation. You must use one of these formats even if your form or survey displays dates in a different format.
For multiple-choice fields (drop-down, radio, yes-no, or true-false), you must import raw coded values, not text labels. For example, consider a multiple-choice field with the following choices:
1, Red
2, Yellow
3, Blue
The corresponding column in your import CSV must contain the values 1, 2, and 3, not the words Red, Yellow, and Blue.
Refer to your project’s Codebook for the codes associated with each multiple-choice field. See the Field Types page for more about multiple-choice fields.
REDCap expands the response options for a checkbox field into separate columns, each of which can have a value of 1, meaning checked, or 0, meaning unchecked.
For example, consider a checkbox field called symptoms with the following options:
1, Cough
2, Headache
3, Fatigue
4, Other
Your Data Import Template will include a column for each choice, called symptoms___1, symptoms___2, symptoms___3, and symptoms___4. For each of these columns, include a value of 1 if the option has been selected by a particular record. Otherwise, insert a 0.
Refer to your project’s Codebook for the codes associated with each checkbox field. See the Field Types page for more about checkbox fields.
Calculated fields will not be included in your Data Import Template, as you cannot manually set the values of these fields. Instead, values will be calculated by REDCap during the import process.
Text fields that use the @CALCTEXT or @CALCDATE action tags will be included in the Data Import Template, but their values cannot be manually edited during data import. Instead, values will be calculated by REDCap during the import process.
See the Field Types page for more about calculated fields. See the Action Tags page for more about the @CALCTEXT and @CALCDATE action tags.
Your Data Import Template will include automatically generated fields to capture the completion status of each instrument. Column names follow the pattern form_name_complete. Form status is coded as a multiple-choice field with the following options:
0, Incomplete
1, Unverified
2, Complete
If your project is longitudinal, with multiple named events, your template will include a column called redcap_event_name. You must include data for different events on different rows of your CSV. On each row, be sure to include the record ID in the first column and the unique event name in the redcap_event_name column. Find event names on the project’s Codebook or Define My Events pages.
The example below illustrates an import file for a project with four events. The unique event names are enrollment_arm_1, visit_1_arm_1, visit_2_arm_1, and visit_3_arm_1. An instrument called Demographics is completed during the enrollment event, while a form called Lab Data is completed during all four events. The image shows data for three records.
- Each row includes the record ID (
study_id) in Column A. - Rows 2, 6, and 10 contain data for the enrollment event. The unique event name,
enrollment_arm_1, is specified in Column B. Data from the Demographics form (columns C through K) and the Lab Data form (Columns L, M, and N) are filled in. - The other rows contain data for visits 1, 2, and 3, with the event name for each row specified in Column B. The Demographics form was not completed during these events, so columns C through K are blank. The Lab Data form was completed during these events, so Columns L, M, and N contain data.
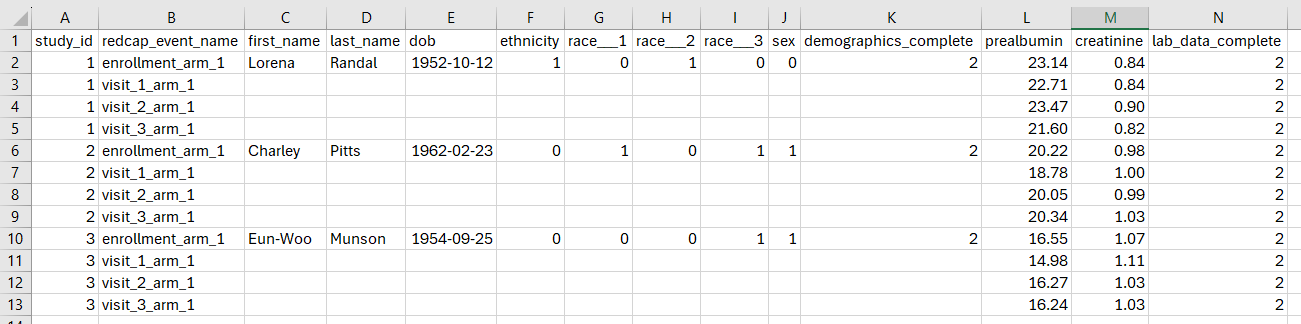
Figure 3: Longitudinal Data Format
If your project has repeating events or instruments, your template will include fields called redcap_repeat_instrument and redcap_repeat_instance. Data from different instances must be included on different rows of your CSV.
- For rows that correspond to non-repeating instruments, leave the
redcap_repeatfields blank. - For rows that correspond to repeating instruments, fill in the name of the instrument in the
redcap_repeat_instrumentfield. Also fill in the number of the instance in theredcap_repeat_instancefield. If you’re adding data about new instances and don’t want to manually number them, you can instead include the word “new” in theredcap_repeat_instancecolumn.
The example below illustrates an import file for a project with a non-repeating instrument called Demographics and a repeating instrument called Visits. The image shows data for three records.
- Each row includes the record ID (
record_id) in Column A. - Rows 2, 7, and 11 contain data for fields on the non-repeating Demographics form (columns D through G), The
redcap_repeatcolumns (B and C) are blank. - The other rows contain data for fields on the repeating Visits form (columns H through J). The
redcap_repeatfields contain the instrument name (Column B) and the instance number (Column C).
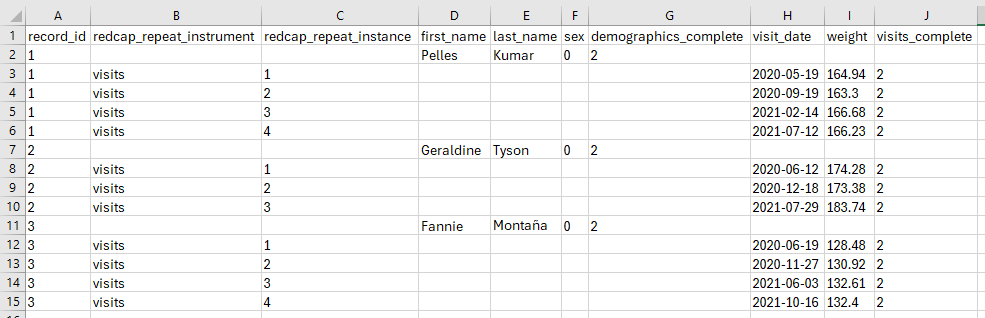
Figure 4: Repeating Data Format
If your project uses Data Access Groups, your Data Import Template will include a column called redcap_data_access_group. Use this column to assign or reassign a record to a DAG. Include the unique DAG name, available on the project’s Data Access Groups page.
When you’re ready to import data, return to the Data Import Tool page. Review the import settings and change them as needed. Then click Upload File. Each import setting is explained below.
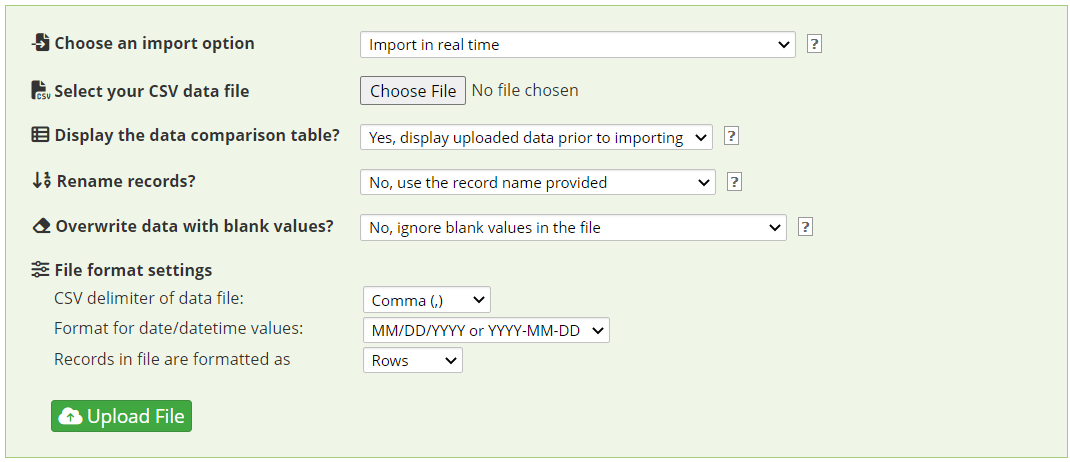
Figure 5: Import Settings
Small datasets can usually be uploaded in real time. For larger datasets, you might want to choose “Import as background process” to avoid page timeouts while the dataset is transferred. With this option, REDCap will email you when the data import process is complete.
Click Choose File, find the CSV file that contains your data, and click Open.
We recommend that you choose “Yes” in most cases. The data comparison table will allow you to review changes before they become final.
If your CSV file contains new or altered data for records that already exist in REDCap, you must include the correct record IDs in the first column of your file. In this case, select “No, use the record name provided” to ensure the new values are attached to the correct record IDs.
If your upload should create new records and your project has auto-numbering enabled, you may want to select “Yes, rename all record names”. This will tell REDCap to assign a new automatically generated ID to each new record. Note that your CSV file must still include the record ID column, with unique values differentiating each unique record, even if those values will be overwritten by REDCap’s auto-assigned record ID.
Select “No” if blank values in your CSV should be ignored during import (common). Select “Yes” if blank values should overwrite existing data in REDCap.
Confirm that the correct date/datetime format is selected. In most cases, the default options for delimiter and record format will be appropriate.
If you have opted to view the Data Display Table, you will see a summary of your data import before it’s finalized. New values will appear in black text. Existing values that will be overwritten will appear in red text. Existing data that will not change will appear in gray text.
If the summary is acceptable, click Import Data. Otherwise, modify your CSV file and repeat the import process.
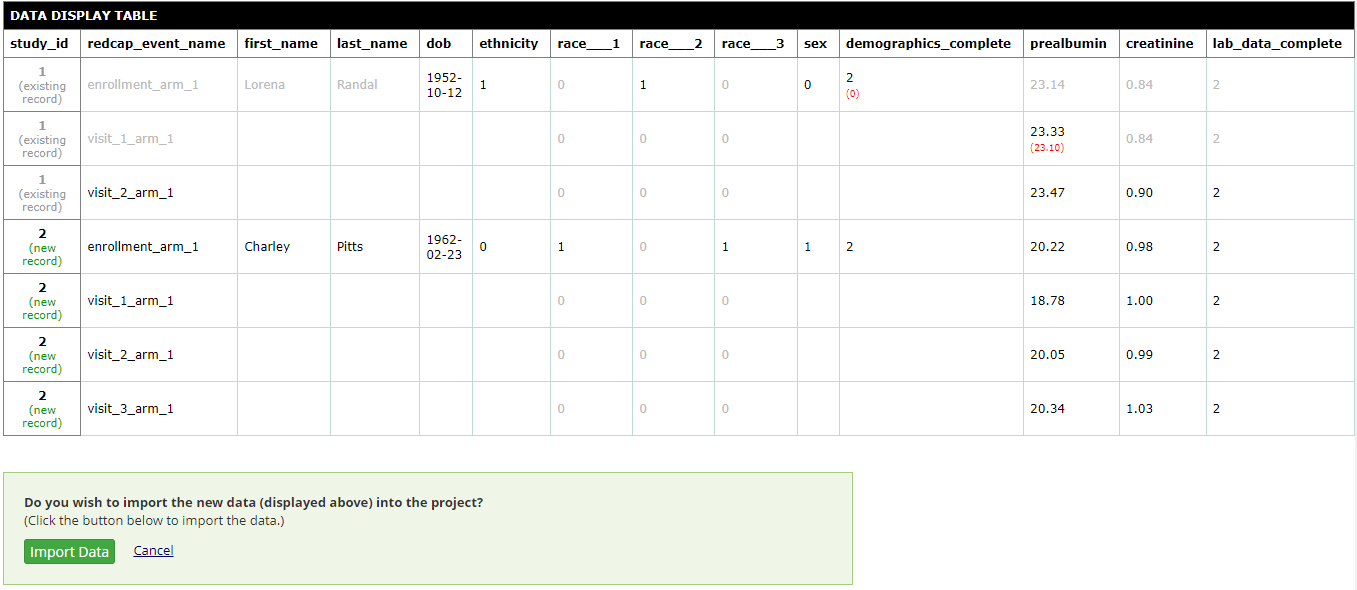
Figure 6: Data Display Table